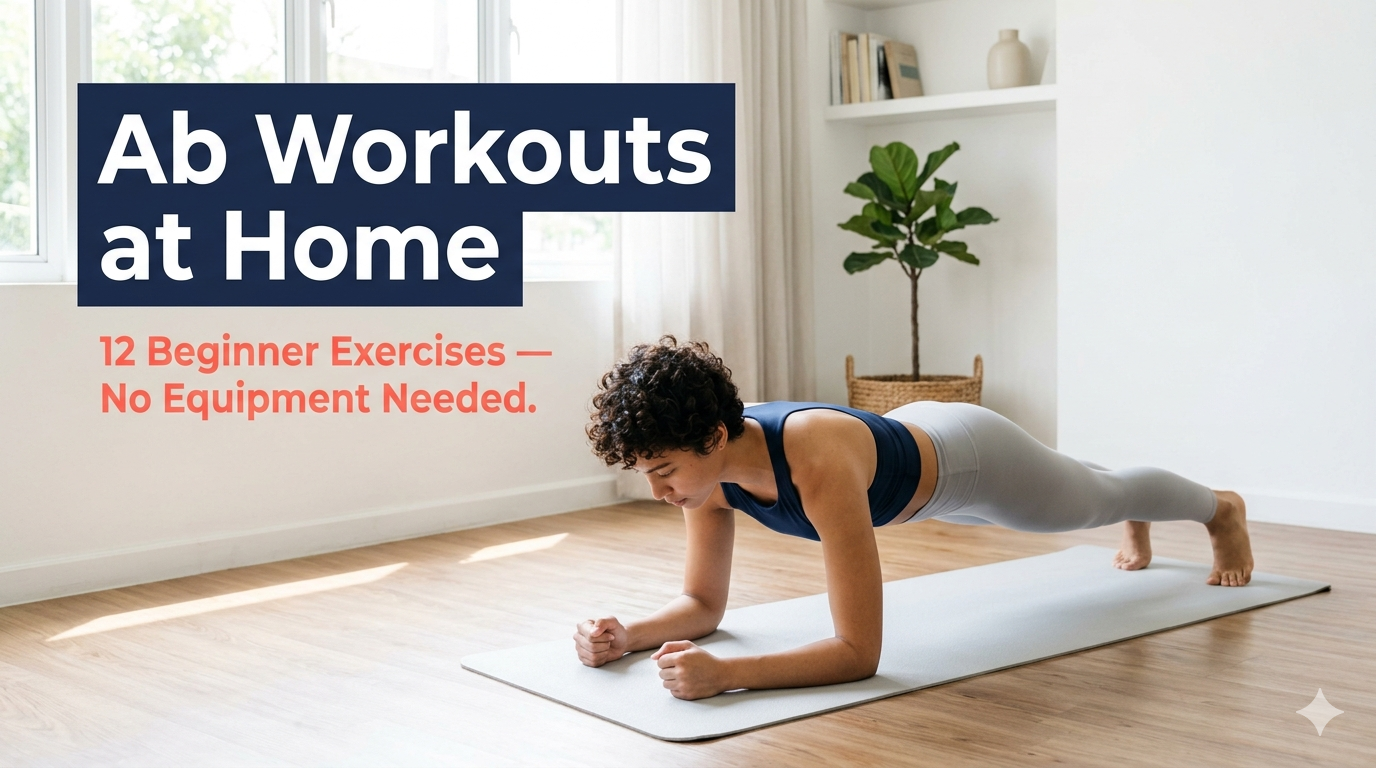
Build a Stronger Core at Home No Equipment, No Gym, Real Results
Last updated: May 2026 | This guide is designed for healthy adults starting core training from scratch. It does not address post surgical recovery, diastasis recti, or diagnosed spinal conditions consult a physiotherapist for those situations.
What Are Ab Workouts at Home?
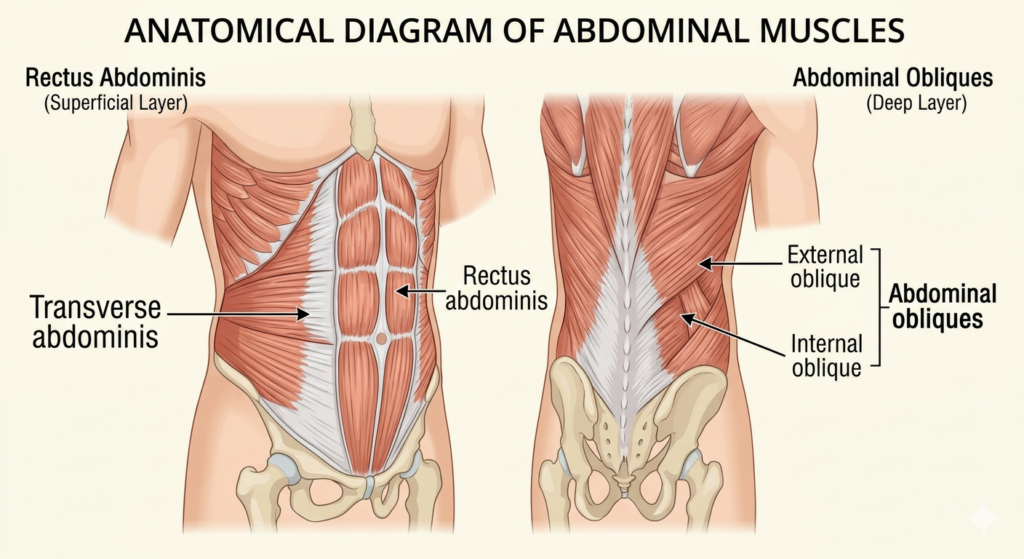
Ab workouts at home are structured core strengthening routines using only bodyweight no gym, no machines, and no equipment required. They target the rectus abdominis, obliques, and deep transverse abdominis through movements like planks, dead bugs, and leg raises. Done consistently three to four days per week, they build functional core strength, improve posture, and reduce lower back pain risk.
Why Your Core Is Probably Weaker Than You Realize
Most people assume core weakness is obvious. It isn’t.
A 2024 prospective cohort study published in the Journal of Orthopaedic & Sports Physical Therapy drawing from the UK Biobank dataset of 365,307 participants tracked over nearly 13 years found that replacing sedentary leisure time with even moderate physical activity significantly reduced back pain incidence. A separate 2024 Global Burden of Disease analysis found that workers spend over 60% of their day in sedentary positions. That sustained inactivity quietly degrades the deep stabilizing muscles of your core long before you feel it.
Here’s the thing: lower back pain and a weak core aren’t separate problems. They’re the same problem. Strengthening your abs isn’t a vanity project it’s structural maintenance for a body that spends most of its time in a chair.
Ab workouts at home are one of the most accessible interventions available. No cost. No commute. No excuses.
The Real Reason Beginners Quit in Week One
There’s a competing school of thought that says “any ab work is better than nothing just start.” That’s valid for someone already moderately active who needs consistency nudges. But if you’re a true beginner, that advice gets people hurt.
Three patterns end most beginner ab routines before they see any results:
- Starting with crunches they demand neck and spinal flexor stability you haven’t built yet, which is why your neck screams by rep 8
- No progression structure doing the same exercises at the same intensity every session until boredom or stagnation kills motivation
- Expecting fast visual results visible abs require reducing body fat, which ab exercises alone cannot achieve
Look if you’ve tried a random 30 day challenge and quit by day 4, the problem wasn’t your discipline. The routine was built for someone already in shape, not someone building from zero.
Users who’ve started with dead bugs and modified planks instead of crunches consistently report that they made it past the first week for the first time. The difference isn’t intensity. It’s sequencing.
What most guides skip is the form failure correction step they show you the exercise but don’t tell you what breaking down looks like or how to scale back when it happens.
12 Best Ab Exercises to Do at Home No Equipment
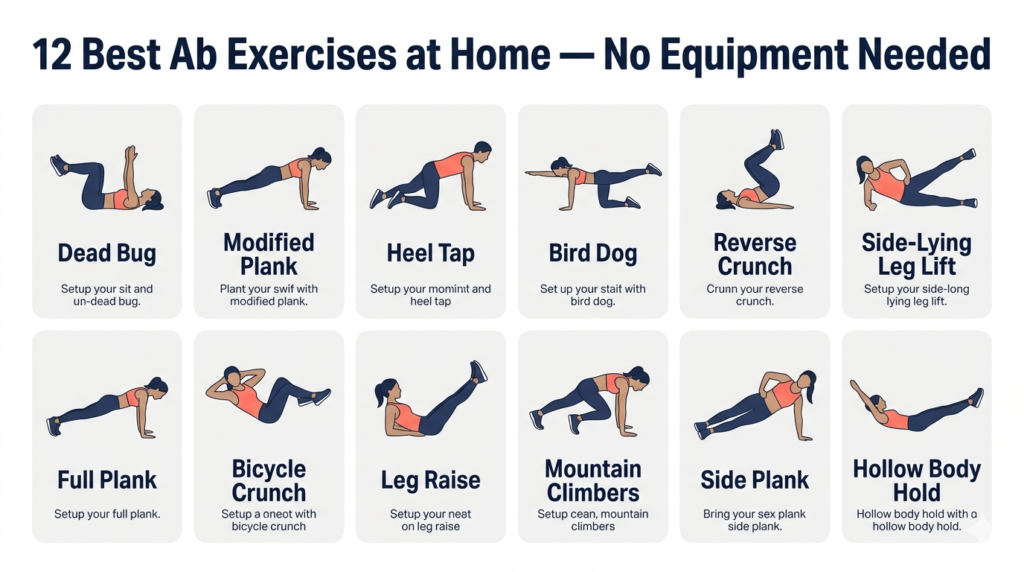
These are ordered by difficulty. Don’t jump ahead. The foundational moves build the stability that makes intermediate moves safe and effective.
Foundational Moves Weeks 1 & 2
1. Dead Bug Lie on your back, arms pointing straight up toward the ceiling, knees bent at 90° in the air. Slowly lower your right arm overhead while extending your left leg toward the floor. Keep your lower back pressed flat that’s the whole point. Return. Switch sides. Why it works: Teaches your abs to brace against limb movement the actual definition of core stability. Zero neck strain. Sets/Reps: 3 × 8 each side
2. Modified Plank (Knees Down) Forearms on the floor, knees down, hips neutral body forms a straight line from knees to shoulders. Hold without letting your hips sag or pike. Sets/Reps: 3 × 20-second holds
3. Heel Tap Lie on your back, knees bent, feet flat on the floor. Crunch your ribs slightly toward your hips to engage your core (don’t pull your head up). Reach your right hand to tap your right heel. Return. Alternate sides. Sets/Reps: 3 × 12 each side
4. Bird Dog On all fours, wrists under shoulders, knees under hips. Extend your right arm and left leg simultaneously. Hold 3 seconds don’t rotate your hips. Return, switch sides. Sets/Reps: 3 × 10 each side
5. Reverse Crunch Lie flat, knees bent at 90°. Curl your hips slightly off the floor using your lower abs not momentum. Lower with control. If you feel it in your hip flexors more than your abs, reduce the range of motion. Sets/Reps: 3 × 12
6. Side Lying Leg Lift Lie on your side, body stacked. Lift your top leg to hip height. Lower slowly. Most articles skip this entirely it directly targets the lateral stabilizers that protect your lower back from side load injuries. Sets/Reps: 3 × 12 each side
Intermediate Moves Weeks 3 & 4
7. Full Plank (On Toes) Same setup as the modified plank, but up on your toes. Squeeze your glutes. Keep hips level neither sagging nor piked. If your lower back arches, drop back to knees and extend hold time there first. Sets/Reps: 3 × 30 second holds
8. Bicycle Crunch Lie flat, hands loosely behind your head not pulling. Bring your left elbow toward your right knee while extending your left leg. Slow and controlled throughout. Fast bicycle crunches are mostly neck movement, not ab work. Sets/Reps: 3 × 10 each side
9. Leg Raise Lie flat, hands under your hips for lower back support. Raise legs to 90°, lower slowly. Stop before your lower back arches off the floor that’s your end range for now. Sets/Reps: 3 × 10
10. Mountain Climbers High plank position. Drive one knee toward your chest, alternate quickly while keeping hips level. This one builds core endurance and adds a cardiovascular element simultaneously. Sets/Reps: 3 × 20 seconds
11. Side Plank Forearm on the floor, body in a straight line from feet to shoulders. Stack your feet or stagger for balance. Hold without letting your hip drop. Sets/Reps: 3 × 20 second holds each side
12. Hollow Body Hold Lie flat, press your lower back firmly into the floor. Raise your arms overhead and lift your legs a few inches off the ground. Hold. This is significantly harder than it looks. If your lower back peels off the floor, bend your knees to reduce the lever arm. Sets/Reps: 3 × 15 second holds
Your 4-Week Beginner Plan How to Actually Structure This
To start ab workouts at home as a beginner, follow these steps:
- Pick 4 exercises from the foundational list above.
- Complete 3 sets of each with 30 seconds of rest between sets.
- Train 3 days per week never on consecutive days.
- In week 3, replace 2 foundational moves with intermediate moves.
- Each week, note your hold times or rep counts to confirm adaptation.
Each session should take 12–18 minutes.
Quick Comparison 4 Week Week by Week Breakdown
| Week | Focus | Exercises | Frequency |
|---|---|---|---|
| 1 | Form & Activation | Dead Bug, Modified Plank, Heel Tap, Bird Dog | 3×/week |
| 2 | Endurance Base | Add Reverse Crunch + Side Lying Leg Lift | 3×/week |
| 3 | Progression | Swap in Full Plank, Bicycle Crunch, Leg Raise | 4×/week |
| 4 | Challenge Layer | Add Side Plank + Hollow Body Hold | 4×/week |
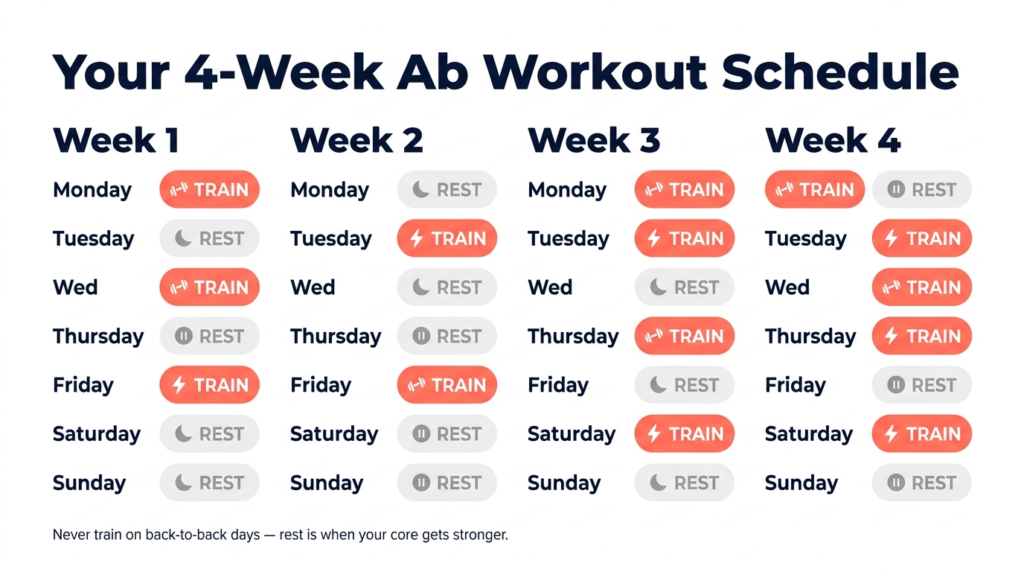
Or maybe I should say it this way: this isn’t a challenge with a finish line. It’s four weeks of building the habit. After week 4, you don’t stop you add hold time, reduce rest, or layer in the next tier of difficulty. The plan doesn’t end; it evolves.
The Part Nobody Talks About Why You’re Still Not Seeing Abs
Here’s where this guide is going to say something some readers won’t love.
Doing ab workouts without addressing your diet will build a strong core. It will reduce your back pain risk. It will improve your posture. What it will not reliably do on its own is produce visible abs. The rectus abdominis exists on virtually every adult body. It becomes visible when the subcutaneous fat layer above it is reduced enough for definition to show through. That requires a calorie deficit, not just more crunches.
I’ve seen conflicting framings on this some fitness sources position ab exercises as “toning” work that makes the muscle “pop” regardless of body fat. My read is that this conflates two separate goals: core strength (achievable through training alone) and visible definition (requires fat reduction). Both are legitimate goals. They just require different interventions.
Use MyFitnessPal it’s free, it takes five minutes a day, and it’ll reveal your calorie patterns faster than any workout adjustment. Nike Training Club offers free structured home routines with built in progression if you want guided sessions beyond this plan. For your floor setup, a decent mat matters more than people think the Lululemon The Mat (5mm) is the gold standard, but Gaiam’s basic 6mm mat at a quarter of the price does the job completely fine for home use.
Quick Comparison Tools Worth Knowing
| Option | Best For | Key Benefit | Limitation |
|---|---|---|---|
| Gaiam 6mm Mat | Budget home use | Grip + cushioning, ~$25 | Less durable long-term |
| Lululemon The Mat 5mm | Daily serious use | Premium grip, lasts years | ~$98 |
| Nike Training Club App | Guided routines | Free, progressive plans built in | Requires phone nearby |
| MyFitnessPal | Nutrition tracking | Shows calorie patterns fast | Needs consistent daily logging |
This guide covers bodyweight core training for healthy beginners. It does NOT address equipment based training, postpartum core recovery, or sports specific core conditioning those require a different framework entirely.
FitnoraWell publishes evidence referenced fitness content reviewed for accuracy. This article is informational only and does not constitute medical advice. If you experience pain during any exercise, stop and consult a healthcare professional.